Pages

Saturday, December 12, 2020

North Bedroom Upstairs - Revisited


The north bedroom upstairs features three cut-away windows located on the front of the house.   
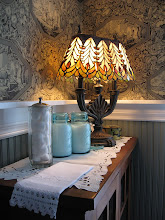
The Tiffany style lamp is perfect for this room.

I refreshed/repainted the floors, changing them from a painted 1940s butterscotch color, to a rich expresso, and area room rug for warmth.  


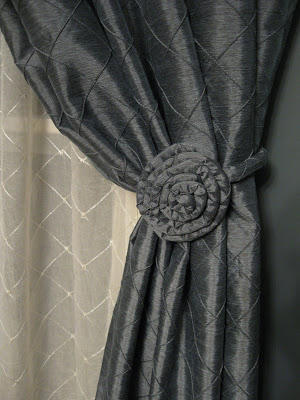
I made the drapes.  And yards and yards of piping for the hem of the drapes, but the fabric being so stiff didn't allow for the piped hem to puddle.  Bummer.  

Oh My Goodness--what to do with 6 yards of piping?  So I divided the piping into (6) one-yard pieces and made tie-backs for the drapes.


Detail of the fabric I purchased to make the North Bedroom drapes.  

Let me tell you how I decided colors for the rooms.  First, it depended upon what drapery fabric I could find on sale.  I liked this one the best.  

After I found the fabric,  I matched the wall color paint to the drapery fabric.  The bluish gray sheer fabric also shown in the above photo I did not end up using because I found off-white ready made sheers with a matching pattern like the drapery fabric.

 I still have that big bundle of the bluish-gray sheer fabric. so I inserted it into the bathtub, with Slim (our 6 ft. decorative skeleton)  and made it look like water covering him.  On top of the sheer fabric I put some prism Christmas garland to look like Slim soaking in a bubble bath.  It was really a funny set-up for our guests during the annual Halloween Victorian House Tour and Craft Show.  


(above photo) Visitors who stayed over too long


This chandelier hung in the dining room 50 years.  I re-wired and Jon re-hung it in the North Bedroom upstairs.  I took this photo before we had installed Crown Molding through out the upstairs. 


Here's the North Bedroom after we moved into the house.  I removed all the wallpaper (walls and ceiling).  Jon drilled holes in the walls to blow-in insulation.  

We kept the original windows with wavy glass through-out the house, but installed storms and screens on the outside.  Insulation and storms and screens were important decisions we made to keep the house warmer and cooler.  And, it made heating the house more affordable, as well as dampening the noise from outside.  Much appreciated diminished noise during snowmobile season (zing, zing, zing, zing), and mowing during the warm months.  


Jon  installed new ceiling and I did all the skim coat plastering on the walls.  Once the skim coat was complete, the walls were as smooth as a baby's butt.  Then a coat of Zinzer 123 primer, and two coats of Polish Pewter (Valspar) satin finish.


I auditioned several table side lamps for the North Bedroom.  


This is a lampshade I recovered with toile fabric.  Later I added two layers of fringe.


Here is the lampshade when I finished it.  You know--covering an old lampshade is quite easy.  Someday soon I will do a tutorial on it for my new website Linda Lu Sewing that is launching in 2021.

***
Thank you for looking at my blog.  Please leave me a comment--I'd love to hear from you.

Wednesday, December 2, 2020

Making Scrappy Queen-size Quilts


Delightful--that's what it means to me to go shopping in my own fabric stash.  I intended to build a colorful quilt, and end up making 3 scrappy queen size quilts!

Look at this pile of vibrant fabric remnants I re-discovered in my sewing studio.  Ah-ha!  And they were just sitting there in the armoire for a long long time.  Folded stacks of 1/4 and 1/2 yard hunks of fabric, waiting patiently for a second chance.  

Quickly I grabbed up lots of yellow, orange, hot pink, and red.  Then selected compliment colors for each: purples, blues, and I salt and peppered it with a bit of sage green,  and a black and white stripe.  

My recipe: cut remnants into 2.5" wide strips, and mixed thoroughly.  I saved all the 1.5" cabbage and gave it to my friend Jerry who looms beautiful rugs.  The slivers, threads and lint went to the waste management truck.  


Top-right is the dwindling pile of 2.5" wide strips.  I selected 6 strips and sewed them together lengthwise to form sheets of fabric, each 12.5" by 40".  

After lightly pressing the seams, I used a 10.5" square. acrylic template to trim and divide the sheet into (3) rail fence blocks.  Since I didn't have enough of the fabric sheet to produce (4) rail fence blocks I used the "Leftover" to sub-cut into 2.5" wide strips (shown at the lower left).  

As I continued to build fabric sheets 12.5 x 40 and make rail fence blocks, the Leftover pile grew and grew (see lower left of photo).  

Then my strategy changed!  I decided to make the Leftover 2.5" strips into a separate quilt with the working title, "You're Kidding Me".


This is the countertop next to my 1992 Kenmore sewing machine--showing a couple piles of 6 strip sets ready to sew together to make 12.5" x 40" sheets.  And way in the background is the Leftover strips to be sewn into 36-patch blocks.  Still with me?  


Yesterday afternoon's photo of the "You're Kidding Me" queen size quilt.  I added busy black and white 2.5" wide sash and solid black corner stones.  

(Not shown) Then the 2" wide solid black border got bigger when attached to a 4" finish fabric (black and white coarse weave patterned companion fabric).  Wouldn't you know, I was tired when I left the studio last night, and failed to get a photo of the finished pieced quilt top.  I promise, I will add more photos as I finish the You're Kidding Me queen size quilt.  This morning I am sewing the backing with an art panel.    

So far--I sewed 106 rail fence blocks--and they will become queen size quilts.  The sashing for those (2) quilts will be a medium blue, and a medium gray.  I've already picked out working titles for those quilts:  Saturday Morning, and Spare Change.  


I want to tell you how enjoyable the processes of rummaging through my fabric stash has been.  I haven't shopped for fabric in the last 6 months.  By shopping my stash--(stash busting)  I feel good about making farmhouse scrappy quilts.  


Above: During Construction--here's the first two rows of the You're Kidding Me queen size quilt.  I pinned the 2-row quilt on the quilting frame to review and to measure.  I wanted to understand and make decisions what I'd need to finish it.  When finished, the quilt has (42) 36-patch blocks.  6 blocks per row, 7 rows in length.   It's going to be 94 x 104 ample queen size when complete.

Updated 12/10/20 - I finished the You're Kidding Me Queen size quilt.  Here are some pics.


My Sewing Machines: My go-to piecing sewing machines are--a 1992 Kenmore, and a 1954 Singer 301A.  The Singer 301 stitches very fast, upwards of 1300 stitches per minute--so I use a blade edged presser foot to keep my piecing straight and accurate, a scant 1/4" seam allowance.  The Kenmore is slower with a top speed of 900 stitches per minute.  

About my 1992 Kenmore.  I bought new machines twice over the last 30 years--and each time I used my 1992 Kenmore for a trade-in.  What was I thinking?????

BOTH TIMES I realized my mistake and went back to the vendor and bought back my 1992 Kenmore.  It is the best machine I've ever used.  

Maintenance-Easy:
Every day I clean the lint out of the bobbin cavity and bobbin race with 3-4 stick cotton swabs.  I find it especially important to clean the feed dogs using a straight pin to lift out lint build up.  Believe me, my machine tells me (and shows me) when its time to clean.

Every 8-12 hours of sewing I install a new 90/14 sewing machine needle.  

Every week I open up the front end, and add a drop of sewing machine oil to each of the joints of the needle bar assembly.  

I arrange for Miss Kenmore 1992 to be serviced every other year by Ken Ropson (Mr. Wizard) of Green Bay, WI--he's the best in the business.  
 
Thank you for looking at my work.   I'm off to the studio to make the backing for You're Kidding Me quilt.   I hope to have it on the frame to quilt by the weekend.

Thursday, October 29, 2020

Evening in the Victorian Red Dining Room


Evening in the red dining room at our 1893 Victorian.

On the west wall, you can see high school graduation photos of family.  At the left column is my mother Lorraine, and below are her parents Earl and Eva.  At the right column is my father Gale, and below are his parents Gilbert and Leatha.

During our first walk-through of the house in Feb 2007, we walked around chunks of ceiling plaster that had fallen on the floor.  I looked at the space between the three dining room windows and thought to myself,  I could hang two columns of family photos there.  

My sister Pam re-designed pairs of store-bought curtains for the red dining room.  She added fancy tassels.  The curtain material bought had perfect colors but not the right style.  Pam turned them into Victorian style elegance with ruffles, poofs, and tassels.


Above: turning the camera view to the right, I snapped a photo of the west front porch door.  A door with original etched glass featuring two herons.  


A few years ago, I took this day time photo of the west front porch door (open), and showing the original screen door. 


Here's the door that leads to the front foyer.  Our 1893 Victorian house had no original fireplaces.  The  heating consisted of parlor stoves used throughout the house--well into the 1930-1940s.  The second owners left information for us to read--about what a chore it was to keep those parlor stoves running to keep an uninsulated house warm during the winter months.  

I bought an electric fire place for the red dining room.  It has pretty convincing faux flames.  And, it just seemed a whole lot safer thing to do.  

Heating our House:
Jon and I are the the third owners.  We restored and refreshed our house over a journey of eight years.  We blew insulation into the perimeter walls of the entire house, and added storms and screens over the wavy glass windows.  

First thing to fix when we bought the house in 2007--we added a new gas forced-air furnace in the basement and a wood burning furnace right next to it.  Since 2007 we heat the house during the winter with wood.   

Six years ago we bought an outdoor wood burning furnace, and (sold) the wood burning furnace in the basement.  The outdoor wood burning furnaces heats: our house, the wood working shop, and my 800 sq. ft. studio (total about 5,000 sq. ft.) and does a great job.  Jon is busy all summer and fall sawing, splitting and stacking wood to keep us in warm comfort.  

I am going to show you the above photograph again, and compare it to a John Singer Sargent painting that reminds me of our red dining room in the evening.


***

Our little (faux) birds  named Edgar, Allan, and Poe wish you a splendid Halloween.


I made this post today, to get you acquainted with our red dining room.  I will be filming some sewing classes videos here--for my new series "Little Purses".  


Friday, October 16, 2020

Handmade Beads to Make Bracelets and Zipper Pulls


I make lots and lots of handmade beads,


to make simple bracelets


The littlest beads shown here are 6/0 glass (store bought)


However, the larger beads are polymer clay beads I hand rolled and baked in my oven.


Soon, on my new website Linda Lu Sewing, you will able to see videos "how I make them and use them" on lots of projects.


The largest beads clay beads are used to make my signature
zipper pulls on Little Purses.

Below:
Singer Sewing Logo machine embroidered design; I sewed purse with recycled blue jeans, leftover batting and cotton prints from quilt projects.  


It's much more fun to grab a handful of beads to zip open and close than zipping with that skinny little zipper tab.

I'll keep you posted when my new website Linda Lu Sewing is launched.  I think it will happen in January 2021. 

The Linda Lu Sewing website will have dozens of My Little Purses available to buy, as well as the purse patterns. and "how to make" videos.


Beaded wristlet straps for purses.  I use handmade beads, 6/0 glass beads, and often vintage buttons.  

Don't worry about the beads ever coming off.  I hand stitch the snot out of them.

Hope you like what you see, and will join me at Linda Lu Sewing website in 2021.

Stay tuned for more information . . .  and thanks for looking at my work.

***
P.S. - I just looked out the window--it looks like snow--holy moley!


Wednesday, October 14, 2020

1930's Wedding Ring Quilt


Gee, how lucky can I get?

Found a beautiful 1930s Wedding Ring Quilt
at a garage sale (one year ago).

Actually, it wasn't an ordinary garage sale because the owner was selling her collection of cotton quilting fabrics, and wools at $3 a yard!  I spent a shameless amount of money, grabbing up her stash.  Picked up all of her 6 yard bundles.  The colors were yummy, Civil War reproductions, and my favorites by Brackman, Morton, Kaufman . . . 

People were shoulder to shoulder in the garage.  I quickly filled a couple boxes, and as I made my way to the cashier, I spotted a folded quilt within arms reach.  Marked $50.  OMG.  Hand-quilted.


The fabric sale was one of those magical moments (when all hell breaks loose, along with my checkbook).  Like a runaway horse and carriage.  It was thrilling ride!

Next Day, I returned and bought more . . . what I really mean to say is, I bought more than I had purchased the first day.  That was a year ago, and more than a dozen queen size quilts later I still have quite a bit of fabric left from the haul.

Seriously,  I make a dozen queen size quilts (start to finish) every year.  Each quilt 20 yards of material: fabric, backing, batting, binding.  And, with other projects sewn during the year--I figure I blow through 250 yards of cotton fabric annually.  I sew every day because I love to sew.

Back to my story about the 1930's quilt I bought at the garage sale . . . 


I showed the quilt to my friend Jerry who is a quilt collector and expert on the subject of antique and vintage quilts.   I've attend a couple of his lectures on quilts.  He's like a walking encyclopedia.  

Jerry said my quilt was mid to late 1930s, and possible into the 1940s.  He spoke rapidly, pointing out the popular design work of stripes, cross-hatched lines, outlined flowers floating in a sea of tiny dots.  Yes, lots of circles, dots, and flowers.  Then he talked about colors, and names of the colors that were popular.  Wished, I'd recorded all he told me about the quilt.  It's a full size quilt by the way, and is in great condition.  I love everything about it, especially the scalloped edge. I'm not saving it for a rainy day packed away.  I use it!  

More Research:

I found these fabric advertisements online


Here are more detail photos of my new/old quilt.  


Thank you for looking at my stuff.  Please leave comments.  I enjoy hearing from you.