Pages

Thursday, May 24, 2012

Wine Tote Project


Supple winter white upholstery fabric makes up the exterior body of wine tote. 

I embroidered a numbered pocket for the front.  

I'm making three more wine totes No. 1,3,5, for a shop display.  

The interior is a black and white cotton. 

The wine bottle bottomless pockets are padded--constructed with layers of  black and white printed cotton, two layers of polar fleece, and black cotton printed cotton.   
Padded pockets keep the bottles from clanging together.

Inside view of the wine tote

*******


I had some gray micro suede fabric leftover from Mark's shopping tote project, and scrap pieces left over from the wine tote bags--to make this purse I call "Tuxedo Purse."  The colors are crisp, and the fabrics are well matched in thickness and softness. 


The purse would have been "enough" as pieced strips, then I had to go all Audrey Hepburn and put a bow on it.   I couldn't help myself.

I padded up the lining, added a magnetic silver snap, and a single deep pocket.

I like the function of long straps.  I considered fabric loops left and right, with silver "D" rings and shorter fabric handles.  Maybe the next purse, eh?

Sunday, May 20, 2012

A Shopping Bag for Mark

Hello Mark.  Are you out there? 

Your personalized tote bag is finished.  Trademark double button and key fob, too.


Be Sure to Check Out
Mark's wonderful blogsite at http://www.allthingsruffnerian.blogspot.com/
He writes about the most amazing things!

******

Mark,  I hope you like the tote bag.  If you don't, then you have an item for your church fundraiser. 

Its a really soft gray micro seude fabric.  I didn't fuss with the details of hair and glasses, but at least you have your trademark mustache.  

On the inside is a surprise. 


Can you see it? 


Will you send me your address so I can mail it this week?

Best Wishes.

Monday, May 14, 2012

Raindrops Keep Falling On My Purse

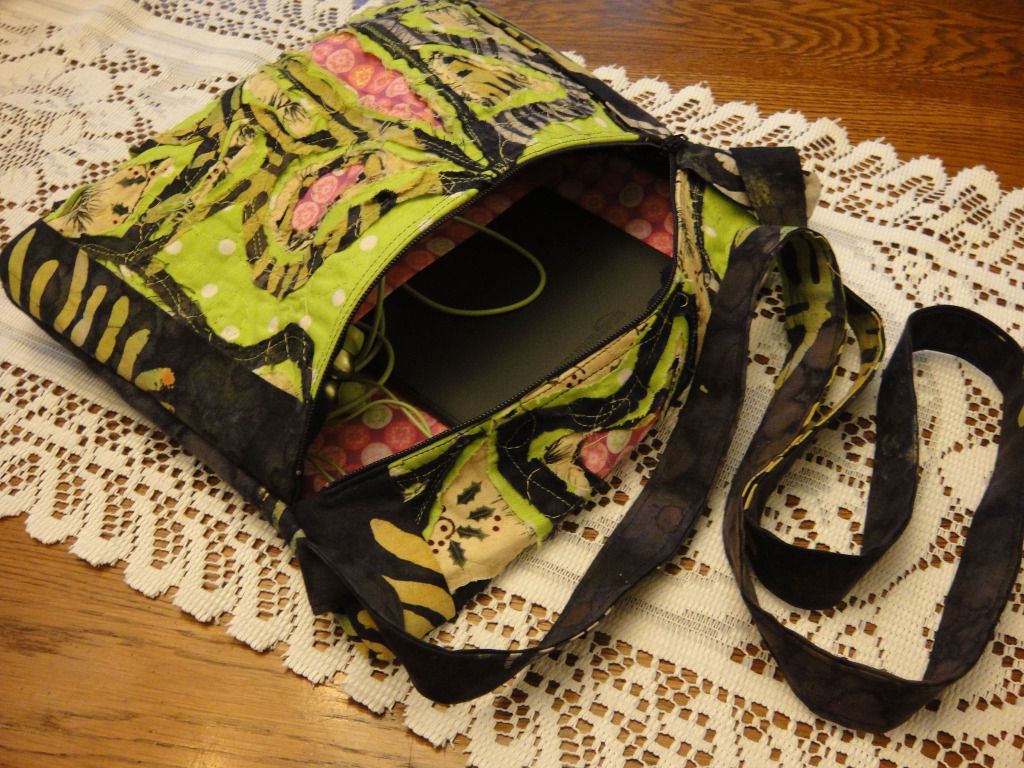
Hold on . . . it's another Stitch &  Slash Purse project!  I call it "Raindrops Keep Falling On My Purse." 


I was inspired by Carol Ann Waugh's Stitch & Slash online Craftsy.com class. I've been sewing 50 years, and I say that in muffled tones with my hand over my mouth . . .  And in those 50 years I've had quite a few sewing instructors, but none so brilliant in personality and knowledge as Carol Ann Waugh.

I highly recommend her online class. 

Here's the link the CRAFTSY Online Classes: http://www.craftsy.com/classes/new

A note to Carol: Wow Carol, you are a great teacher. Your online class at Craftsy.com really got me going--and now I'm constantly thinking about stitching and ripping fabric to make funky fabric.


Yesterday--Mother's Day, I challenged myself to use the ugliest fabrics in my stash and create this handsome large purse. Making this funky fabric is a beginner sewing project.

Below: are samples of the fabrics I used.  The top fabric was an olive brocade, then a layer of turquoise/blue batik cotton, then a coarse cotton weave that raveled well--giving a feathered edge to the shapes, and the bottom layer was the orange cotton upholstery fabric.


Below: a close up of the layers torn away 1/4" from the stich line with a seam ripper.  I used the tip of the seam ripper to scratch at the raw edges to create texture.
I ironed copper metallic lame' to a double sided fusible web (Stitch Witchery) and cut out large circles, and then cutting those circles in half to make comma shapes for RAINDROPS!

The idea for the title of the purse came from listening to the radio yesterday and hearing a Burt Bacharach song from the 60s "Raindrops Keep Falling on my Head."

Above: this photo shows texture--as the coarse weave cotton fabric boldly unraveled.  After a haircut with scissors--I snipped away the long cross weave unraveled strings.

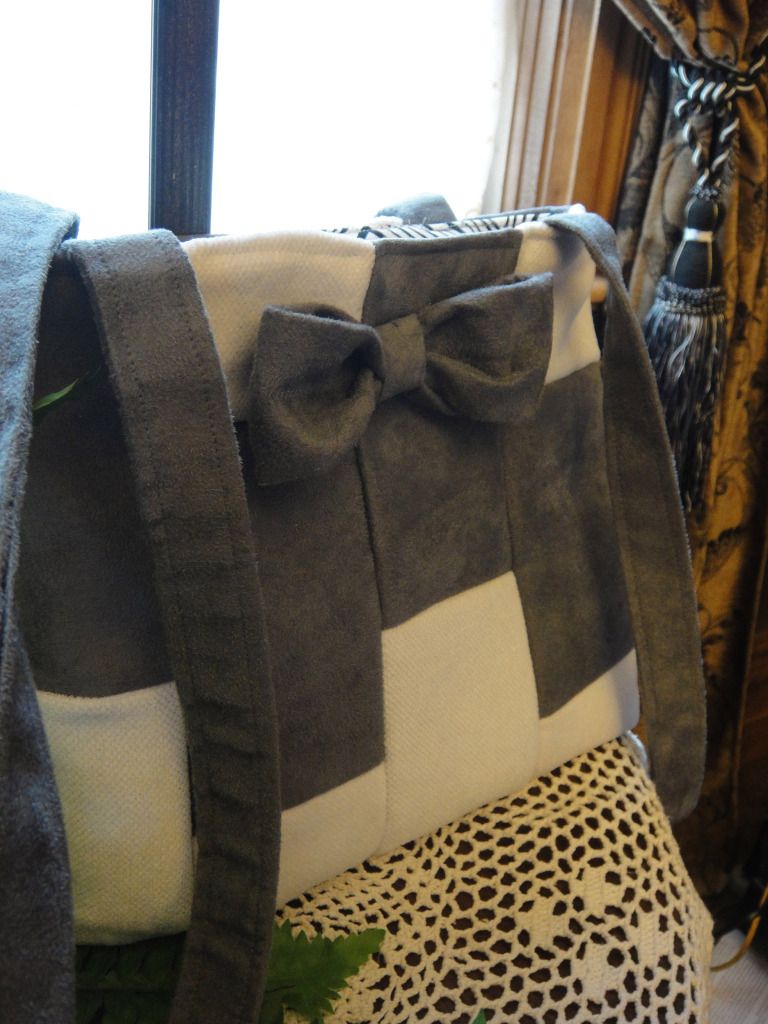
I had a little more orange cotton fabric, and re-introduced the high contrast orange as margins, and shoulder straps. 
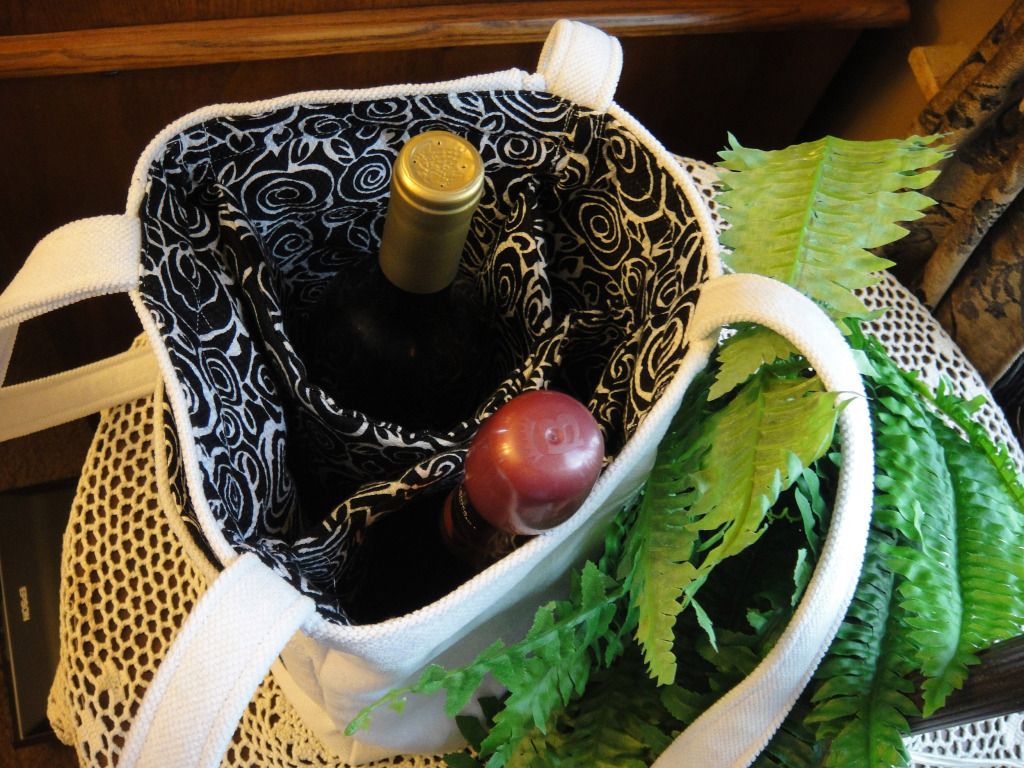
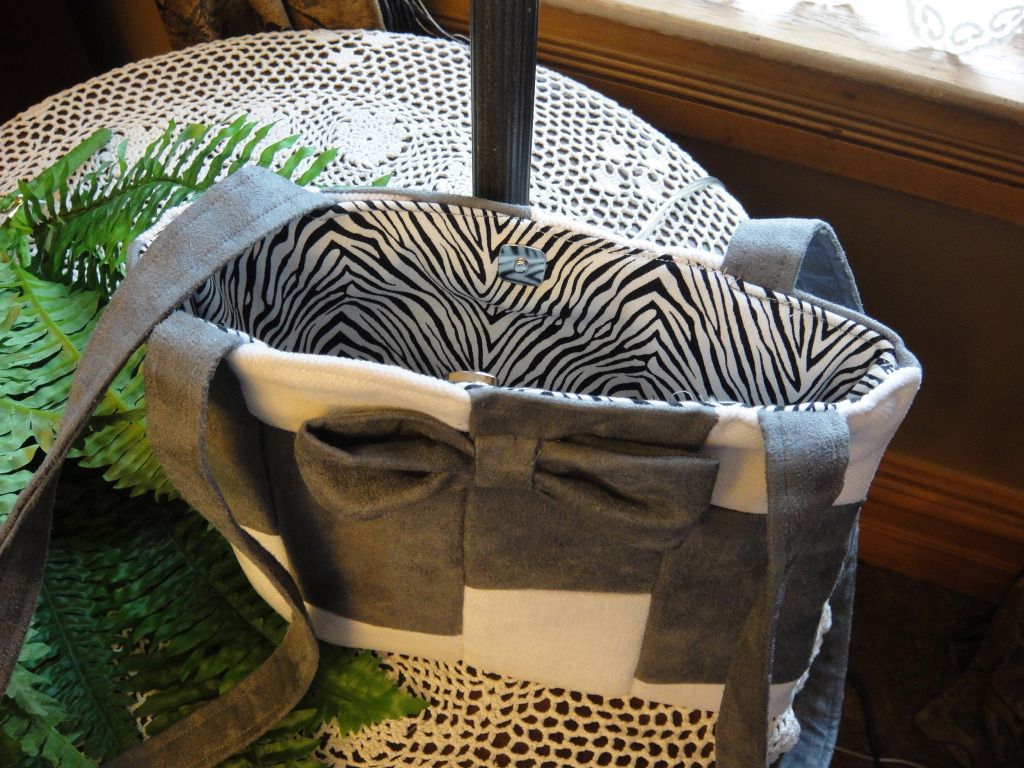
The function of the bag is really fine-tuned for me.  Inside the gold brocade lined bag are two water bottle pockets, and a zippered pocket big enough for a checkbook and cell phone.  Mom sent me her stash of old zippers, and I easily found a zipper for $0.  Thanks Mom!

By the way, Happy Mother's Day Mom--my Mother Lorraine is an extremely talented seamstress who was and still is my primary sewing instructor.  When something ain't working right on the machine, my first call is to my Mom Lorraine.  She always begins, 1) did you try re-threading the machine?  2) did you try using a new needle?  3) when is the last time you cleaned the bobbin case?  She's my go-to sewing expert.

One year Mom made 63 garments for us kids.  She kept the number count circled on the kitchen blackboard.  I'll never forget all the beautiful prom dresses she made for us girls.  Thanks Mom, for teaching us how to sew.  Think what we would have missed out in life--if we had not been seamstresses like you?  We'd have to take up bass fishing like Dad, eh?  What a disturbing thought!


I made the bag from fabric leftover from other projects . . . except the key clasp I purchased (2) in a package for under $3.  How economical is that?

The layered fabrics make this large purse (shopping tote) very sturdy.  The orange theme will work for a summer purse and well into the autumn. 

My next purse will be called, "Bubble Yum- I'ts Bubble Gum" 

Using color theme of grayed blue/green wall color, white trim, and the vintage bubble gum machine in my upstairs bathroom. 

Got a quarter?


Saturday, May 12, 2012

Yesterday's Project: Stitch & Slash Fabric Art Zippered Bag

I took a sewing class on line last month from Carol Ann Waugh at Craftsy.com

Had a blast learning how to make my own funky fabric.

My project - a zippered bag to store and carry my Kindle and earbuds.

Inside the bag is a bright pink candy fabric liner w/ pocket


Here's the how to make funky fabric. 

I layered 4 printed fabrics (pretty side up), one on top of the other. 
Then, machine stitched around the perimeter to hold them together. 

I chose 4 fabric layers in descending order:
navy batik (on top)
 lime green polka dot
parchament holly berry Christmas fabric
navy batik (on bottom)

Once the layers were stitched around the perimeter, I drew large teardrops and dog bone shapes on the top fabric (navy batik) with a white chalk marker. 

I stitched those shapes with my sewing machine--using bright yellow thread--because the stitch line becomes part of the funky design.


Then the fun began. 
I started cutting away layers of fabric, leaving only 1/4" of fabric following the stitch lines.   Deciding what to leave, and what to cut, is fun.  You can't really make a mistake, honestly. 

In the end, I knew I needed another pop of color,
so I cut completely through all four layers in some smaller shapes to make windows in the fabric. 

I auditioned several new fabrics underneath, peeking through the window holes. 

I tried a medium red fabric and it was too drab. 

On a hunch I grabbed some pink candy dot fabric and slipped it underneath the four layers of fabric so I could see little windows of pink here and there.  Yes!  that looked good.


With the pink fabric at the bottom of the stack, I used a quilting foot (darning foot), dropped my sewing machine feed dogs, and quilted the devil out it,  fusing the layers together nicely.

I used a rotary cutter and mat to straighten the finished fabric
and cut extra 4" strips of navy batik fabric to trim the sides of the bag, and make the shoulder straps. 

To assemble bag, I installed a navy zipper
and pink candy dot fabric liner with pocket, and it was done. 

Nice little bag to carry and store my Kindle.  I like to listen to books while traveling or sewing. 


I'm going to try my hand at making more of these fun bags.  Would you like one?  Let me know. 

Friday, May 11, 2012

Repairing Stairwell Walls

My brother and I finished the hallway upstairs.  Next, Willie starts preparing walls in the stairwell.  

My brother Will sits on a temporary wooden scaffold.  It's oriented strandboard (osb) custom fit for the stairwell, and supported by wooden cleets bolted into the wall.  I'll be taping the corner joints and doing some skim coats.  My brother will do web tape crack repairs and the sanding between skim coats of drywall compound. 


Will is checking the wall surface for hairline cracks to be repaired with web tape embedded with Durabond.  He wets the yellow painted wall with a spray bottle to remove spits of old wallpaper.

The former owners started to remove wallpaper, then stopped, change their strategy and decided to paint the walls covering small spits of stuck wallpaper, and larger areas of wallpaper.     

We have some thumb size areas of missing plaster and will use rock hard Durabond to make those repairs.  Good News: the stained glass window and trim is dirty but in good shape.  No moisture damage anywhere to be seen. 

We found the original picture rail in the attic, and will re-use it in the hallway and stairwell.  My intention is to line the entire length of the hallway with photos, land grants, education certificates, etc. of the two previous owners family members.  And, then I have a huge collection of my family's old old photographs. 

At the mouth of the stairway, there are 2 metal hangers bolted into the wall (left and right) carrying a 2 x 4 underneath supporting the the oriented strand board.


Above - here's a look at a portion of the wooden scaffold Jon built so we could work on the stairwell.  To work on the stairwell, we quickly install the 2 x 4 board into the metal hangers at the top of the stairs, and click in place the remaining puzzle piece that completes the scaffold. 

When we finish the walls in the upper stairwell, Mr. Kinnison (the crown molding wizard) will install the crown molding upstairs.  After the crown molding is installed, we'll dismantle the wooden scaffold in the stairwell and continue the wall repairs down the stairwell and into the foyer. 

Tuesday, May 8, 2012

NEXT WINDOW PLEASE


There is a farm supply store about 15 miles from my house called Fleet Farm.  It is my husband's favorite store.  Jon claims "if you can't find it at Fleet Farm, then you don't need it."

I buy Bear Creek brand Darn Good Chili in a package at Fleet Farm.  It is great tasting.
Other varieties of their dry mix soups are Minestrone, Chicken Noodle, and Cheesey Broccolli.

I always add more sauteed vegetables.
By the way, isn't this a cool sign?

  It came from an office or bank in Chicago.  My great uncle Herman used to clean office buildings and re-paint apartments between renters. 

Herman was a handyman for hire way back in the 30s, 40s, 50s.  He always found amazing things to bring home.  Sometimes it was junky junk, and sometimes real treasure. 

Before he went into a nursing home, we went through tons of things--he was reluctant to throw away or give things to us for keepsakes.  His home in Chicago was always a 250 mile trip for us, and seriously it took 7 years of weekend trips to sort through his stuff.

I remember once we traveled to Chicago to help him sort, and all he sent us home with was a tin of buttons.  We'd just shake our heads, and try to picture ourselves in his shoes. 

Uncle Herman was a bachelor who loved his independence, and hated its loneliness at the end of his life.   His favorite thing to tell me when I was pushing him to get rid of things was, "Don't Bug Me."  Even though he was being naughty saying that, I'd have to turn my head away so he wouldn't see me chuckle. 

I love the NEXT WINDOW sign.  Wish I knew the real story where he found it.  Wonder why he drug it home.  I move it around the house as decoration.  Occasionally it tops a stack of old books.  I used to take it to work with me and plop it on my desk, just for fun.  Always got a laugh. 
I see beauty in it.  I see Uncle Herman.  And can hear him say, "Don't Bug Me."
(Makes me smile).

Here's something worthwhile to share with you.  I make sweet potato treats for our two Jack Russell dogs,
 Fred and Rainie
I wash the torpedo shaped sweet potato, and cut off a deep slice on either end. 
Standing the potato up vertically I slice chips anywhere from 1/8" to 1/4" thick. 
Bake them 325 degrees F for 30 minutes, then turn them over and bake another 10 minutes.

After cooling I divide them into 2 sandwich baggies and store in the refrigerator.  Our dogs love them.  They eat as many as three per day.

The naturally sweet vegetable treats are inexpensive compared to other purchased treats, and quite frankly help our doggies complete their daily routine comfortably.  They are older dogs now and need a little help.  Ok. Ok.  Why am I talking about doggie laxatives?  I'm going to stop!