Pages

Wednesday, April 6, 2016

Toast and Jam Quilt

Toast and Jam Quilt

Finished Toast and Jam Quilt (4/7/16)
North Bedroom (formerly downstairs parlor)
Left and right on photo are the original pocket doors.

***
More About the Quilt and Inspiration for Creating It

In 1964 we were dancing the Swim to The Newbeats #2 Hit,  "I Like Bread and Butter, I Like Toast and Jam".

Back then--we wore white bobby socks and tennis shoes with ankle tapered slacks.  And, we wore cut-offs . . . they were blue jeans cut-off and rolled up to just above the knee and we paired them with white blouses.  My sister had a white blouse with ruffled cuffs and ruffled placket--I borrowed it, and wore it until it was thin.  Sorry Pam, I owe you a blouse, don't I?

Bread and Butter (song)
https://www.youtube.com/watch?v=-mx7vZDhStI

The Newbeats were Larry Henley, Dean and Mark Mathis.  Larry Henley's high falsetto voice was as shocking as it was fun.

A year later we were still dancing the Swim and the Monkey to the Newbeats hit, Run Baby Run (back into my arms).  Larry went on to co-write "Wind Beneath My Wings" made famous by Bette Midler in the 1988 movie Beaches.

Run Baby Run (song)
https://www.youtube.com/watch?v=3OIGUXnE3rg&list=RD3OIGUXnE3rg#t=14


Loading the Quilt 

Free-style Quilting the Border

Inspiration for Toast and Jam Quilt:
Oh there's nothing quite like toast and jam is there?  I can turn a piece of buttered toast into a slice of pie with a bit of grape jelly, or strawberry jam.  Other great flavors--raspberry, rhubarb, apple butter, honey, or peanut butter make toast my "any time" snack, breakfast, or quick lunch.  

Quilt Colors:
I like all of these jam/jelly/toast/peanut butter colors.  In my quilt I included a bluish frost that appears on dark grapes, and blueberries.  Various shades of burnt toast from browns to black punctuate the quilt.  But, I wince smelling Jon's dark version of tortured toast.  Uft-dah! 

loading backing 

 I pieced the burgundy homespun backing fabric with left over blocks from constructing the quilt top.  There are so many great reasons to add scraps to the backing.  My primary reason: to add width so I can attach left and right frame side clamps (horizontal tension).  It takes an extra day or two to piece a backing, but so worth it.

Burgundy homespun backing fabric - a bit of serendipity

Burgundy homespun fabric for the backing?  Huh?  Yes, oh yes, Burgundy must be the right choice for this quilt--as in . . .  Ron Burgundy. 

The 2004 Will Ferrell comedy, Anchorman: The Legend of Ron Burgundy featured the Newbeat's song, "I like bread and butter, I like toast and jam".

I auditioned several fabrics to make the backing,  but I kept going back to the Burgundy homespun fabric.  It was like, Run Baby Run, (backing into my arms).  Ok, Ok,  I know, I know, I've totally lost my mind right?  


After I finished quilting, I slowly rolled quilt back to the beginning (looking for any missed areas).   


Also, it gave me a chance to take additional photographs of both top and back of the quilt.  The nine patch blocks look like slices of toast. 

I am auditioning yo-yos for the border.  I can't decide whether to use yo-yos, or lined prairie points.


Auditioning yo-yos and lined prairie points border


Let me know if you like one or the other, or both?  

Toast color or Jam color for the binding?  What do you suggest?

I'll post more photos soon--to show you how I make the lined prairie points, ok?

P.S. - I have a bad cold.  Feeling sick today.  It's 6:30a.  I'm going back to bed.

I got up early to take some aspirin, then I sat down at the computer to review Toast and Jam Quilt photos.  I worked on this post while eating toast and jam and coffee with milk.  I'm serious. 

UPDATE

Postscript (Day After)

Here is a photo showing how to make the lined prairie points.

I learned how to make the fancy lined Prairie Points in 
Susan Cleveland's amazing Craftsy online class,  "The Perfect Finish: How to Bind a Quilt".  I highly recommend her class--jammed packed with ideas.

Step 1  - - - - - - - - - - - - - - - - - - - - - - - - - - - - - - - - - - - lower right sample.  

Cut one long strip of fabric 2.5" wide (exterior of the prairie point). 

Cut one long strip of fabric 3" wide. (accent color - the lining)

Join these two strips with right sides together by sewing 1/4" seam allowance.  

Press seam to one side.

Fold strip in half lengthwise as if you were preparing binding strips for your quilt.  

I use my fingers to join the raw edges together and press.  I use a steam iron.

Cut the strip into 5" widths (pieces).  

Sorry if this is confusing---in the above photograph, I had already prepared the prairie points and just unfolded them a bit so you could get the jist of how I made them.  

Next Step Fold 5" piece in half, and press. 

Next Step Re-open each 5" piece to reveal center press line.  

Final Step Fold corners down towards the pressed line.  Press again.  

I use prairie points as an border accent.  After the quilting is finishing,and I've square (trimmed) the perimeter, I pin the prairie points to the border.  I stitch the prairie points to the border, using scant 1/4" or less (but consistent).  

Then, added binding to finish the quilt.   I'm finishing last side of the quilt--stitching the binding in place as we speak.  I took a quick two photos to show you how the prairie points look (in the border) of the quilt.  I decided not to add yo-yos to this quilt.  It just made the quilt too busy looking.
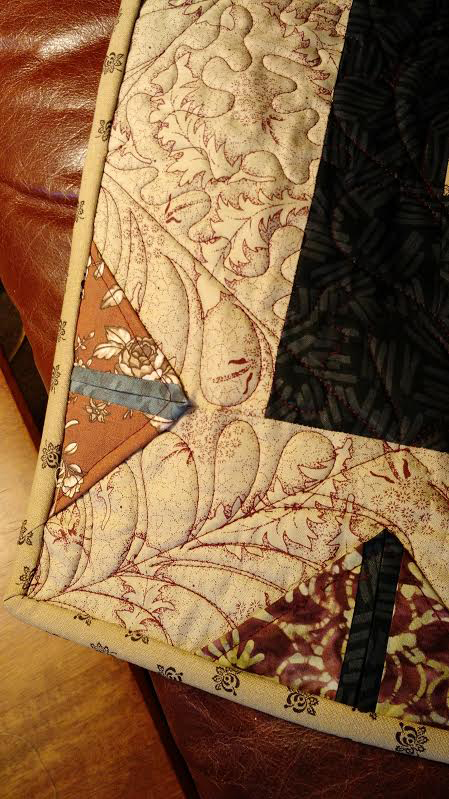


Prairie Points on the Border


Next, my friend Joette and I are planning our two versions of Red Fire Monkey Quilts . . . 

Do you know what the Red Fire Monkey Quilt is?  We don't either (yet).  We're making it up as we go along.

The 2016 Chinese New Year celebrates the Red Fire Monkey . . . 
stay tuned for some monkeying around . . . 


Friday, March 18, 2016

Lovely Scraps

Stars 'n Stripes 'n Scraps Quilt (queen size--just finished Sun 3/13/16)

Answering the question--what to do with all those lovely fabric scraps?

I'm still pecking away at my fabric scrap piles, building as many scrappy queen size quilts as I can by May, then I'll switch to building purses, baby quilts, table runners, and pot holders.

I am full speed in my commitment to reduce 3 big bins of scraps, mostly 2.5" strips.  

I have a fourth bin full of 1.5" strips - and here's what those 1.5" strips made in the past:

a decorative pocket for a soft luggage, this travel bag is 22 x 22.
and 
I make other soft luggage out of upholstery material--oh yeah, got a big bin full of upholstery material scraps.  Here are a couple pics of the soft luggage


the small cotton fabric scraps I build these . . .
little padded pouches with metal swivel clasp to carry cell phone or eye glasses.


and rope baskets that are cool 
seriously, it takes a full day to make one of these.


I wrap fabric strips around 1/4" cotton clothesline rope to create a disc (bottom of the basket), then I start nudging the disc upwards with my left hand to build the wall while I stitch.  A zig zag stitch holds firmly.


Ok, ok
back to photos of current quilt  Stars 'n Stripes 'n Scraps . . . 

my signature free hand edge to edge quilting "Feather Bouquet"

I confess, even after doing the last three quilts--I made only a dent in the scrap piles.
Ah, oh well.  I'll keep sewing 'n sewing.  


I'm sure I mentioned one more scrap pile of 1" wide or less strips and short lengths??
I give them to my friend Jerry who uses all the colorful bits in beautiful rag rugs he looms.  They are gorgeous!

Here's the half way point of long arm quilting process. 


Lots of color


loading quilt (floating quilt)


After removing the quilt from the frame, I cut away excess batting and backing, square the quilt, sew 400+ inches of fabric binding, install the binding, then sit for 5-6 hours turning the binding and hand stitch.  It's not complicated work.  Its time consuming, but relaxing.


I'll drop in more photos later.  Right now, I'm going to take a nap.  

Talk to you later.


Sunday, February 21, 2016

Navy Blue Scrappy Quilt


I finished piecing Navy Blue Quilt, composed of scrappy flying geese and cornered blocks. 

Detail of block construction
Sashed flying geese blocks, added corners to make a diamond in the center,

Sewed the 4 blocks together, and added 4 more corners to make offset diamonds.


MY GOAL: to feature as many scrappy bits as possible this year in my quilts.

My overflowing scrap bins have lots of 1.5", 2.5" wide strips.  When hunks of fabric are reduced to less than 1/4 yard--I set them aside for applique work, yo-yos, and strip quilting.  Building scrappy quilts are my favorite.  Did you notice the flying geese blocks are made from scrappy strips?

During the summer months when we do craft shows I bring along my 1916 Singer model 128 hand crank sewing machine and a laundry basket full of 2.5" x 8" strips or shorter.  I sew them end to end, forming hand size rolls to make scrappy quilts.  

1916 Singer, Model 128 is a 3/4" sewing machine.
She's little, and pretty.

Check out the beautiful "Victorian" decals.  Nearly perfect condition.

All original parts, including the hand crank

The bullet shaped bobbin shuttle whips back and forth dispensing thread.  Inside the shuttle is a bar bell shaped wound bobbin.  

bent wood case and key

The machine is so well balanced, makes an effortless chuga-chuga sound.  

Controlling the fabric with one hand is easy, while turning the crank.  

Hand crank machines were very popular in England, as no respectable turn of the century woman would power a machine with her legs!

Ok, ok, back to the Navy Blue Quilt . . .


Almost ready to quilt.  Next, I added a scrappy border to the quilt, loaded the quilt backing, cotton batting and quilt top on the frame.  

I made my first video today using Jon's GoPro Hero4 camera.  I used a chest harness to hold the camera--while I filmed.

Maybe tonight I'll edit the film, add some music, and post it!  

In the mean time, here are some still photos of the long arm quilting process on the Navy Blue Scrappy Quilt . . . 

I am stitching my Feather Bouquet sequence, interrupted by small meander.  Huh, I haven't stitched small meander since making the Science Friday Quilt in June 2013.  I'm out of practice.

I chose "Kiwi" color thread for contrast

The leaves are a repeating feature in the quilt.  

I transferred the leaf images using freezer paper cut outs in the shape of sawtooth leaves.  


Ironed the freezer paper leaves in place while I had it loaded on the quilt frame.  
Stitched around the freezer paper.  Easy.

This is a genius method as it eliminates chalk pencil outlines on dark fabrics, and I don't have to use rulers to do the work.  

It is a technique I learned in Cyndi Souder's online Craftsy class, "Hitting the Mark".  
One of the best classes I've taken on Craftsy--I highly recommend it.

I designed the Navy Blue Scrappy Quilt with lots of negative space just so I could try Cyndi's freezer paper transfer technique.  I will use this technique to design and plan future quilts.  Great tool.


Lots of Wow--going on with this quilt.  It's a thread-eater, and will take 4 times the labor to quilt. 

Below are some photos of the finished quilt--binding completed, and laid out on the north bedroom upstairs.  Funny, how different lighting affects the photography.  To clarify:  THE NAVYV BLUE BACKGROUND IS REALLY DARK.   


Stick around--I'll post the film (my first video) later showing how I quilted this one.