Pages

Thursday, April 28, 2011

Lace: Antique, Vintage, and Thrift Shop

I'm always hunting for attractive lace and crocheted trim.  Yesterday I visited a little vintage shop in Poy Sippi and found some antique, some vintage lace and trims.

 
Cutwork I found yesterday.  Today I sewed pillow cases and attached cutwork trim. 

The lace I'm looking for must be at least 40-44" lengths to make fronts for two pillow cases. 

When I buy cotton broadcloth for pillow cases, I wait until the cloth is on sale, then buy 12 yards at a time--enough to make 6 pair of pillow cases--on sale that usually means about $25.  Immediately I cut the cloth into 1 yard lengths, perfect size for an overstuff pillow.  Then I fold up the cloth and put it aside for a sewing day when I want to do some quick sewing for gifts.


There is nothing like jumping into a deep mattress, all dressed up in butter soft sheets and thick comforter, and laying my head down on a crisp white pillow jeweled in nice lace.  Sounds great, until  I get a major hotflash--rake off the comforter, jump out of bed and turn on the fan.  Two minutes later, I cool down and give it another go. 

The "next window" sign is 1920-30's, a favorite item from Uncle Herman.  I used to take the sign to work with me occasionally.  I always got a comment or laugh out of it.

I draped this lace remnant across a finished pillow.  It has a hand crocheted scallop.  The remanent is 40 inches.  Enough for two standard pillow fronts.

The pillow at the right hand corner is trimmed in some contemporary cutwork.  I believe I purchased it at St. Vincent DePaul's thrift shop for a couple of dollars.  It had been someone's bathroom or kitchen valance.  When I saw it in the thrift shop I grabbed it up fast--I knew it would make a great looking pillow case.

In the 1950s my mother made herself a dress from this turquoise and white print.  The dress had a gathered skirt, and bodice featured a white cotton collar.  I took it apart as it had a torn seam.  Using a rotary cutter and I cut three inch strips to create these tailored pillow cases.  The dress strips made quite a few pillow cases, enough to share the memory of Mom's dress with my sisters.

The pillow case openings are standard 22" for over stuffed pillows.  But personally my bod isn't quite comfortable enough using an overstuff pillow.  However, I confess I put overstuffed pillows in the spare bedroom--cause they look really great.

I'm passionate about trims with scallops.  White on white is classic.


Served up in a glass candy dish is the find of the day--antique tatted lace, 86" priced at $12.50.  So the question is do I spent $12.50 for a Sunday roast, or do I go for the antique lace and pull the ham bone out of the freezer for ham & beans on Sunday.  Yep, I guess it will be little windy this weekend! 

Saturday, April 16, 2011

A Few More Lampshades I Sewed This Week

Here is a another finished lampshade.  There is quite a differene in color when lighted.

The beads were salvaged from another vintage shade that had some stains on the fabric.The beads were in fairly good shape, but it took some patience to remove them from the shade without breaking them apart.   


Getting the trim on straight seems to be my biggest grief.  I mount the lampshade on the lamp base and put it eye level when I glue.  Perhaps you'll have a good tip for me how to get the trim on straighter. 

While it would have been great to use the original scalloped detail on the beads, I found the scallop portion torn in places and in pretty rough shape when salvaging it from another old lampshade.  After the beads were on, I covered the damaged scallop trim with an ivory braid.


Now, here's some pretty fabric.  Leftover from making draperies for the master bedroom. 


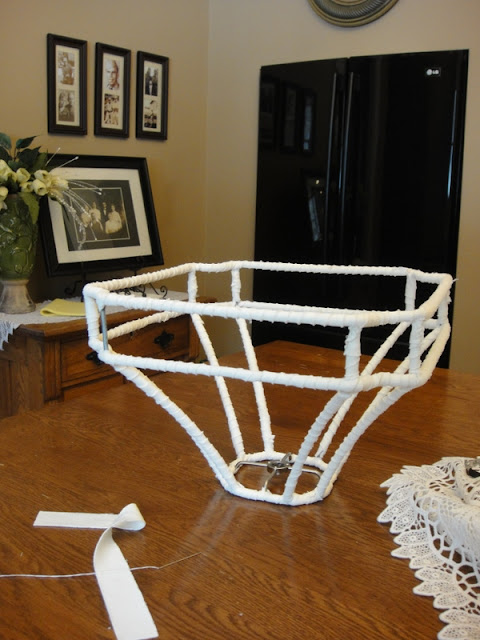
Below is the start of the pale olive lampshade.  Because it has 8 sections each panel is sewn separately. The vintage shade was prepared by wrapping all the struts, and securing with stitches. 

I make my own wraps.  A softer, stretchy material cut with a rotary cutter in 1 inch strips.

Ah finally, I catch the last wrap with a few stitches.

Once the wraps are attached, cut a larger than needed section of fabric and position so the print motif sits right where you want it.  Pin in place, direct pins through the wraps to hold the fabric snug against the frame.

The panel is secured with small stitches around the panel section.  Carefully, trim away excess fabric close to the stitches.    By the way, you may have noticed--this shimmery pale olive green fabric has two thin layers, the other side has a negative imagine.  

Well, that's enough sewing talk today.  Its 4:30p and I have to start dinner.  I've been baking pumpkin pies while I typed this post.  Smells pretty good in the house.  We're having breaded pork chops, mashed potatoes, green beans, and deviled eggs.  Sometimes we have Sunday lunch on Saturday night.  Then, we can relax over leftovers on Sunday. 

Wednesday, April 13, 2011

Making a Cover for a Lampshade

This month I've been tearing down vintage lampshades.  The frames require sanding, spray with Rustoleum, and wrapping the metal frame to provide a wrapped surface to attach fabric to the frame with handstitching.  Here are some photos showing the process of making a fabric cover.  


Drape a double thickness of fabric over half the shade.  Have the fold of the fabric at the top.  Pin and mark side seams with fabric marking pen.  A fabric marking pen has purple ink that disappears later.

 Cut out fabric, allowing extra for a seam.  You can straighten seams lines a bit using the marking pen and ruler before you sew.  At the top, cut the fold.


Place right sides together, pin, and sew seam.  Trim seam to 1/8". 


Turn the fabric, and slide over the shade.  Pin top and bottom snug.  This is a step I repeat several times.  Usually the cover is too big first fitting and I take it off, sew another 1/8" from last seam, and trim seam again.  You want a nice snug fit.  
 Eventually, you'll get the nice snug fit you want.  I use a thick bathtowel on my kitchen table to protect the finish from the sharp pins. 

 Once the pins are in place, you can handstitch the fabric around the top and bottom.  Be sure to STOP when you pick yourself with the pins.  You don't want to transfer blood from your finger to the fabric.  Take your time.  Your stitches will be covered by trim, so the sewing technique you choose doesn't have to be pretty, but the material needs to be snug and attached with enough small stitches.


Above photo: the top is snug and ready to be handstitched around the perimeter.

After you handstitch the top and bottom frame, trim away extra fabriic close to stitches, and add decorative trim with hot glue gun.

I used eyelash trim at the top and acrylic beads at the bottom.