Pages

Tuesday, September 29, 2009

Halloween and Other Porch People


This is Jumpin Jack Flash. We welded him together a couple of years ago with steel rod frame, added a hunk of 2 x 4 for a neck, a recycled pumpkin head, pool noodles for arms, and some clothes. I had a problem getting his pants on, and had to open up the inner leg seams to dress him, then sit under him to sew his pants backup.

Friday, September 18, 2009

1903 Photo of our Front Porch

Imagine our surprise. The Iola Historical Society brought us this amazing photograph of our home c. 1903. Second left is our own Mabel Wrolstad, youngest daughter of Mathea and John Olson Wrolstad (builders/first owners of our 1893 Queen Anne). I'm guessing she's about 16 years old in this photo.

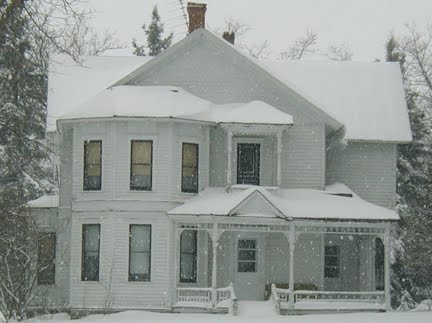
Below is the porch as it is today. Not much changed. I'm in the process of restoring the original 116 year old porch spindles (cleaning, patching with wood filler, sanding, replacing dowel ends). We refrabricated the two-piece railings to match original. When I finish spindles we'll re-assemble railings and build front steps. Later on I'll post photos as we complete the project.

Unfortunately the original railings are wafer thin, broken and decayed. Nonetheless we saved all those pieces and gave some pieces to grandchildren of the second owners.

Saturday, September 12, 2009

Building the New Garage


I really know nothing about building a garage. And my words below fail to describe the building process. But, here goes . . .

Jon and Dad (Gale) are putting up the new garage this week. They've had some help from brother Willie, and friend Al a couple of days. Mom and I pick up nails, materials, and we sweep at the end of the day.
Mom and Al watch Jon up in the trusses, tying the trusses one to the other with a series of lengths of lumber.

The garage footprint is 28 x 48. The gable ends running north and south.

Willie and Al watch Jon up in the trusses. Later on Willie will begin nailing OSB Board on the roof. The 48' length of garage will be divided in half. The south end a modified workshop for Jon, and the north end two garage door openings.

Securing trusses together with a ladder type fixture (see fixture lying on the floor).

The bucket truck lifts trusses into place.


Putting up OSB Board on the exterior. Later long metal straps are attached to the side walls to add strength.

Jon coming down from the trusses.

Brother Willie helping install OSB board, while Jon attaches with nailing gun.

Preparation work was extensive before the garage could be built. Several trees were removed, tree stumps dug up and hauled away. Weeks and weeks of adding course fill, tamping, and installing floor drains. The concrete pad just below the truck is in front of a soon to be passage door.
Dad (Gale) drilling holes to mount wall section on the sillplate bolts.

Day 3--three walls are up!

Dad (Gale) drilling holes in the wall section.

Beginning the garage project.

Jon, Willie, and Gale attach OSB Board to the walls.

Gale attaching sillplate around perimeter of garage.

Earlier in August, pouring the concrete for the garage.

Saturday, August 29, 2009

Bathroom things . . .

While I was upstairs photographing the Tiffany style lamp in the bathroom, I stopped a moment to take a few more photos, and describe them here. We really enjoy this bathroom.
The jelly cabinet holds dark brown baskets, making it difficult in the best light to reveal any clutter. I like that.
Mom bought me some beautiful lace towels. And, the cut-lace runner I purchased in Illinois on the Spoon River Drive. The Spoon River Drive is every October (first and second weekends), flea markets and sales one right after another. Such fun to roam and look at all the stuff.

When we first bought the house in the spring of 2007, I found this bathpowder container in the downstairs bathroom beadboard cabinet. The bathpowder Le Jade was introduced by Roger & Gallet in 1923. Inside was another surprise.

I found out the box of dye is around 1919. I bought an original 1919 magazine advertisement for Rit Dye showing the same box (artwork). One of these days I'll get around to getting the magazine advertisement framed. Right now, its in storage in a little cardboard tube upstairs. I hope nobody throws it away by mistake.
For the most part the upstairs still looks like a homesless shelter. We only have two rooms completed upstairs (master bedroom and this bathroom). We're moving along at a snail's pace. But, during the summer months we carry our restoration work outside.
I'm still struggling to finish painting the house exterior--but have a major wasp problem keeping me from finishing. The exterminator guy took care of the wasps today. Jon is building the new two story garage in the next couple of weeks. So, looks like we'll have lot of new photos to post.


Mom gave me some beautiful blue Ball jars with glass lids. I filled them with menthal scented bath salts. If I leave the lids off, I can smell it and use it as a room deordorizer. Cotton balls in a glass and chrome star dispenser hide close behind the ball jars. I love the watery blue-green colors and crisp white. But what makes it dance is the reddish woodwork in the jelly cabinet and floors.

Lamps, Oh I love the colors!

Above:
Tiffany style lamp in the office downstairs. This lamp has a really huge shade. I am attracted to the green gold and red orange accented with black and expresso brown.

This unusual oval shaped Tiffany style lamp sits in the upstairs bathroom on the jelly cabinet next to the sink.

Jon gave me this lamp for Christmas '08. I keep it lit most of the weekend, so I can enjoys its color and design. Looks great in the red dining room.


This Tiffany style lamp is in the living room. To the right is photo of the original owner/builders John and Mathea Wrolstad and their children.

Tuesday, August 25, 2009

It's good to open up the door and find you standing there,
for just to hear you say hello can banish all my cares.

And when you come inside this house you bring so much along,
companionship, an arousing smile, that turn the hours to song.

These visits give the heart a lift one can't afford to miss.
And life is richer through the years because of hours like this.

So come as often as you can there's dreams for us to share
It's so good to open up the door and find you standing there.

****
I don't know who wrote the poem,
but my grandma Eva taught me the words.
Thank grandma. I love you and think of you often.

The etched glass door shown here is on the (north) front side of the house. It is the door to a very small balcony. It is nice to open the door during the summer days and walk to the end of the hall to the new 'old' bathroom and open the windows. The air flows nicely through the upstairs hallway. Smells good.
Tuesday, August 18, 2009

About Covering Vintage Shades

If you want a great $20 handbook on covering vintage shades, look at www.shadecrafters.com/ Everything you'll want to know about recovering shades.

You can find vintage shades all over the place. Take off the old cover. Sand and spray the metal frame. Wrap the horizontal top and bottom circumferences.

Wrap opposing (2) vertical struts and pin fit double thickness material beginning at one vertically wrapped strut and pin to the opposing strut.

With a chalk mark the fabric along the strut to make your pattern. Note: the material stretches if you use the weft.

What is weft? (from salvage to salvage is weft). For more stretch use the bias of the fabric.

Its a bit of work, but I find the entire process a joy. You can find some real bargains in the $6-$12 range from antique shops, thrift stores, flea markets.

Above is a simple cover and liner for a barrel shade.


There are really great trims at the fabric shop. Be sure to pay attention when trims are on sale because the fancier the trim the higher the price per yard.
My dining room valances cost $7 worth of fabric, but the 3 yards of tasseled trim was $18.00 a yard. Yikes. But, the look is fabulous.
You can buy a tube turner and make big, medium, and really tiny fabric tubes--when pressed out they make economical trim.
Make tiny fabric tubes of different material and braid them together--make your own trim for pennies.

Sometimes pretty trim doesn't work out too well. The pearl braid for this shade was exasperating to keep it straight without a wobble. Oh well, I learn as I go.
Before I added the pearl braid, I made some trim from the shade fabric. I cut it on the bias and pieced the bias strips together. Bias trim has the most stretch and will smooth out better when gluing.
I use low temperature glue, the skinnest glue sticks I can find. That way, the glue doesn't get away from you. You really only need the thinnest bead of glue to hold the trim in place.

I make my own material wrap to cover the metal frames. The wrap is there so you have something to sew the material to.

Fancier multi-paneled frame must be stretched and hand-sewn a panel at a time. Above: I got such a deal on this one--I found a pair of them. Way cool. The first one is under construction but I left it at my Mom's house by accident when I visited her last June. Mom lives 400 miles from me. I'll see her again in October and pick it up. I'll have to post the "under construction photo" later.

Here's another multi-paneled lamp shade. Nice shape. Vintage frame. Blue and white cotton fabric, with eyelash fringe and crystals. Made my own trim from material to cover the multipaneled struts to hide the hand-sewing.

Here's the blue & white shade from the interior. A multi-paneled frame doesn't have a liner because of the complicated shape.

Another view of the blue and white vintage lamp shade finished.


Above: Blue & White lampshade. Pretty when lit at night.

My sister Pam made the fancy drapes when she visited in June 2008.

With the left over material from the drapes, I covered and lined a simple shape metal lamp frame I bought at Good Will for $3. I picked a silky polyester for the liner.

Above, another view of the interior of the lamp.

Above: the finished lamp that matches the drapes.