Pages

Wednesday, June 29, 2016

Restoring Another Victorian House


Good News--for my Brother Will
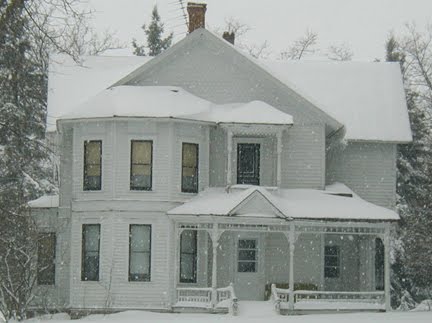
He bought an 1892 Queen Anne Victorian in Wild Rose, WI
And it needs restoration.  I jumped on board to help him.


I hope you will follow the restoration of WILD ROSE VICTORIAN HOUSE.  It is a beautiful home with original woodwork and stained glass windows!

Use the link above, or look to the right margin of my blog--see MY OTHER BLOGS.  Click on the link,  Wild Rose Victorian House.

Be sure to submit your email to follow us daily/weekly to see photos and hear about our progress.

Standing in front of the vestibule/front entrance, my brother Will is repairing hairline wall cracks in the living room, covering strips of web tape with Durabond.

I am working the perimeter of the living room, from the chair rail upwards as far as I can reach on my small 4-step ladder.  

When we first looked at the living room with 7 doors, we could see large bumpy, lumpy wall cracks under layers of wallpaper.

We opened those poorly repaired cracks--scoring and cleaning away the bumpy repair with a 5-in-1 tool, then re-filled them in several stages with hand mixed Durabond.  Once the wounds were closed and hand sanded, strips of web tape are embedded with a skim coat of Durabond.  No more bumpy lumpy. 

Will and I spent the better part of June here in the living room steaming layers of wallpaper. 

 Removing wallpaper is tedious even with a steamer.  One thing is for sure, you get to see every single hairline crack as you scrape stamp size bits and bigger hand size pieces of wallpaper.  
The paper was stuck down tight.  

First day, we thought spritzing water infused with fabric softener would remove the wallpaper quickly, but it didn't.  We switched to a steamer and the paper came off better, not great, just better.

Paint was flaking off of these beautiful stained glass windows in the office.  I removed the 1980s shutters, then put on my mask and brought out the shop vac with hepa filter to start scraping.

 2 of 4 Stained Glass Windows in the office.

Below: brother Will has some incredible stained glass windows and doors in the front entrance

He removed the interior door #1 to the living room, giving me better access to removing wallpaper.


Lots of weighted wavy glass windows to remove, re-glaze, reinstall.  

The first window I dismantled and re-glazed--the ropes and weights worked well.  I hope this is good sign for the remaining windows.  I re-glazed with Dep 33 glazing compound.  My first attempt to re-glaze looked terrible, so I  did it again, and again, and 3rd time it looked great--smooth and the bevel angle really nice.  I let it the glaze cure for a more than a week, now I'm ready to prime and paint it.  


I ordered some canvas prints of George Washington, Abraham Lincoln, and Benjamin Franklin--my brother's favorite statesmen.  Those art pieces will arrive next week for his Living Room and Office.  In the mean time I brought over my copy of a framed print of George Washington.  Ha. Ha.  I brought George over for a visit.  

Sometimes I hear brother Will giggling, and I hear him tell himself what a good jobs he's doing.  
Then I start to laugh.  

This is repetitive, but relaxing work.  I never get used to the idea the room looking a whole lot worse before it turns the corner and starts becoming lovely.  We can see past the mess at this point, and are excited about the next steps.  Hope you'll follow WILD ROSE VICTORIAN HOUSE blog.


Monday, April 25, 2016

Night Shirts Quilt

I dreamed of a blue and gray bed quilt.

Squares in a square, and then it kind of developed into "split squares in a split square".


So much for the gray--the blues ran away with this quilt.

I dug into the 1/4 yard and 1/2 yard remnants.  My goal is to reduce my scraps/remnants by making one scrappy queen size quilt each month.  So far, 5 quilts finished.  But really, the count is 6 queen size quilts since the beginning of the year I'd forgotten about--one I built for an artist friend Sue with kaleidoscope blocks, yo-yos and hand stitched beaded prairie points called "Folk Art Quilt" pictured below.


Because I added yo-yos to this quilt (while quilting it) I had to move the take-up rail upwards to make room for the extra yo-yos adding to its thickness.  The rolled up quilt kept getting fatter and fatter as I quilted.  I needed extra space under the take-up rail.

Moving/messing with the take-up rail caused me lots of problems on subsequent quilts.  I moved the too tall take-up rail down for the next quilt.  But this adjustment made the quilt frame out of square.  I learned a good lesson, but it I was slow to process what was going on.  Problems coming my way.

I couldn't get my head around why I was tugging and snugging at my next quilts during the long arm process.  I checked quilt frame level and it was perfect.  Here's the deal though.  Listen closely, and pretend your shoulders are the take-up rail . . .

Now stand up straight as you can, hands at your side.  Nice and straight shoulders you think?  How about curling your left shoulder inward about 1/4".  Go ahead, curl your shoulder slightly forward.  Now, your shoulder is not square.  I was driving my quilt slightly sideways down the road.  All the tugging and snugging I did, trying to keep things in line while I quilted was puzzling to me, but I wasn't understanding why.

This is how you can screw up your machine timing, and the position of the stitch finger.  Ask me how I know, and better yet ask me how much it cost to repair it.  Ugh.

***
Jon squared my quilt frame for me on Sunday.  He cut me a wood tool too, to check distance from the left, right, middle of the belly bar to the take-up rail.  He scribed Sharpie lines at the left and right uprights on the belly bar and take-up rails . . . to give me an opportunity to check and double check before I start a project.  It is another couple things to add to my start up checklist.  But that's ok.  Lesson Learned.  Did I tell you my serger died last Monday?  Oh my, what a week!

Ok--now let's get on to the photos of Night Shirt Quilts.  It turned out fine, I got my long arm machine repaired.  Wonderful work performed by Ken from Green Bay, the sewing machine whisperer.  I re-loaded the quilt and finished hand stitching binding Saturday night.  Done.


Feather Bouquet, free style edge to edge - free motion quilting


taking the beast off the frame


backing features art panel of left over blocks from the quilt top


Time to Rest!

I love the double border.  Used up sub-assemblies from the smaller split squares, sewed them end to end to create border.  Bye, bye, scraps. 

I bid a fond farewell to a particular fabric.  Navy with small turquoise paisley.  You are gone now, used up in several scrappy quilts.  I loved you, you little bugger.  I will miss you.

Thanks for stopping by my blog.  

Wednesday, April 6, 2016

Toast and Jam Quilt

Toast and Jam Quilt

Finished Toast and Jam Quilt (4/7/16)
North Bedroom (formerly downstairs parlor)
Left and right on photo are the original pocket doors.

***
More About the Quilt and Inspiration for Creating It

In 1964 we were dancing the Swim to The Newbeats #2 Hit,  "I Like Bread and Butter, I Like Toast and Jam".

Back then--we wore white bobby socks and tennis shoes with ankle tapered slacks.  And, we wore cut-offs . . . they were blue jeans cut-off and rolled up to just above the knee and we paired them with white blouses.  My sister had a white blouse with ruffled cuffs and ruffled placket--I borrowed it, and wore it until it was thin.  Sorry Pam, I owe you a blouse, don't I?

Bread and Butter (song)
https://www.youtube.com/watch?v=-mx7vZDhStI

The Newbeats were Larry Henley, Dean and Mark Mathis.  Larry Henley's high falsetto voice was as shocking as it was fun.

A year later we were still dancing the Swim and the Monkey to the Newbeats hit, Run Baby Run (back into my arms).  Larry went on to co-write "Wind Beneath My Wings" made famous by Bette Midler in the 1988 movie Beaches.

Run Baby Run (song)
https://www.youtube.com/watch?v=3OIGUXnE3rg&list=RD3OIGUXnE3rg#t=14


Loading the Quilt 

Free-style Quilting the Border

Inspiration for Toast and Jam Quilt:
Oh there's nothing quite like toast and jam is there?  I can turn a piece of buttered toast into a slice of pie with a bit of grape jelly, or strawberry jam.  Other great flavors--raspberry, rhubarb, apple butter, honey, or peanut butter make toast my "any time" snack, breakfast, or quick lunch.  

Quilt Colors:
I like all of these jam/jelly/toast/peanut butter colors.  In my quilt I included a bluish frost that appears on dark grapes, and blueberries.  Various shades of burnt toast from browns to black punctuate the quilt.  But, I wince smelling Jon's dark version of tortured toast.  Uft-dah! 

loading backing 

 I pieced the burgundy homespun backing fabric with left over blocks from constructing the quilt top.  There are so many great reasons to add scraps to the backing.  My primary reason: to add width so I can attach left and right frame side clamps (horizontal tension).  It takes an extra day or two to piece a backing, but so worth it.

Burgundy homespun backing fabric - a bit of serendipity

Burgundy homespun fabric for the backing?  Huh?  Yes, oh yes, Burgundy must be the right choice for this quilt--as in . . .  Ron Burgundy. 

The 2004 Will Ferrell comedy, Anchorman: The Legend of Ron Burgundy featured the Newbeat's song, "I like bread and butter, I like toast and jam".

I auditioned several fabrics to make the backing,  but I kept going back to the Burgundy homespun fabric.  It was like, Run Baby Run, (backing into my arms).  Ok, Ok,  I know, I know, I've totally lost my mind right?  


After I finished quilting, I slowly rolled quilt back to the beginning (looking for any missed areas).   


Also, it gave me a chance to take additional photographs of both top and back of the quilt.  The nine patch blocks look like slices of toast. 

I am auditioning yo-yos for the border.  I can't decide whether to use yo-yos, or lined prairie points.


Auditioning yo-yos and lined prairie points border


Let me know if you like one or the other, or both?  

Toast color or Jam color for the binding?  What do you suggest?

I'll post more photos soon--to show you how I make the lined prairie points, ok?

P.S. - I have a bad cold.  Feeling sick today.  It's 6:30a.  I'm going back to bed.

I got up early to take some aspirin, then I sat down at the computer to review Toast and Jam Quilt photos.  I worked on this post while eating toast and jam and coffee with milk.  I'm serious. 

UPDATE

Postscript (Day After)

Here is a photo showing how to make the lined prairie points.

I learned how to make the fancy lined Prairie Points in 
Susan Cleveland's amazing Craftsy online class,  "The Perfect Finish: How to Bind a Quilt".  I highly recommend her class--jammed packed with ideas.

Step 1  - - - - - - - - - - - - - - - - - - - - - - - - - - - - - - - - - - - lower right sample.  

Cut one long strip of fabric 2.5" wide (exterior of the prairie point). 

Cut one long strip of fabric 3" wide. (accent color - the lining)

Join these two strips with right sides together by sewing 1/4" seam allowance.  

Press seam to one side.

Fold strip in half lengthwise as if you were preparing binding strips for your quilt.  

I use my fingers to join the raw edges together and press.  I use a steam iron.

Cut the strip into 5" widths (pieces).  

Sorry if this is confusing---in the above photograph, I had already prepared the prairie points and just unfolded them a bit so you could get the jist of how I made them.  

Next Step Fold 5" piece in half, and press. 

Next Step Re-open each 5" piece to reveal center press line.  

Final Step Fold corners down towards the pressed line.  Press again.  

I use prairie points as an border accent.  After the quilting is finishing,and I've square (trimmed) the perimeter, I pin the prairie points to the border.  I stitch the prairie points to the border, using scant 1/4" or less (but consistent).  

Then, added binding to finish the quilt.   I'm finishing last side of the quilt--stitching the binding in place as we speak.  I took a quick two photos to show you how the prairie points look (in the border) of the quilt.  I decided not to add yo-yos to this quilt.  It just made the quilt too busy looking.


Prairie Points on the Border


Next, my friend Joette and I are planning our two versions of Red Fire Monkey Quilts . . . 

Do you know what the Red Fire Monkey Quilt is?  We don't either (yet).  We're making it up as we go along.

The 2016 Chinese New Year celebrates the Red Fire Monkey . . . 
stay tuned for some monkeying around . . .