Pages

Thursday, February 4, 2010

Sneak Peek - Finished Drapes

Here's a peek of the hand-sewn tiebacks for the North Bedroom.  The 1930's walnut desk and matching dresser are in place, the bookcase will be set this weekend.  The sleigh bed and mattresses arrive next Tuesday afternoon.  I'll be posting more photos Tuesday evening after I dress the bed.  This is the playing "dress up" part I like best.  Like all projects, they have a beginning, a middle, and an end.  Restoring this room took about 2 months.  I think that's a good pace considering we both work full time.

We first saw our old house from a distance in 2001--we used to drive by the house on our way to get groceries in Stevens Point every other weekend, and we'd sit in the driveway for 15-20 minutes just to admire it and wonder, "wouldn't it be great if someday we could fix up this old house?"  We repeated that viewing and pondering over and over again for six more years until 2007. 

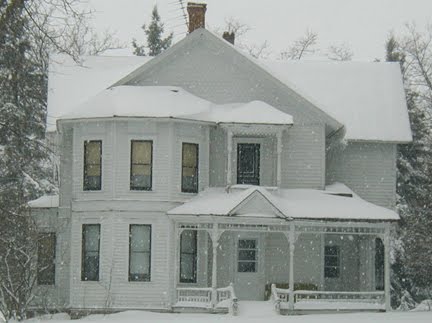
Our house sat vaccant for 37 years until we had the great opportunity to buy it.  By the time we were the third owners there was no water, the electricity coming into the house looked like 2 kite strings, the dining room ceiling was partially on the floor, and the porches were falling down.  BUT nearly everything in the house (woodwork, hardware, floor plan, windows) remained the same since it was built in 1893.

Sunday, January 31, 2010

North Bedroom Windows - Before & After

"After"
I finished sewing the casings on all of the sheers and dark blue/gray drapery panels (panels not shown here).


The little oak lamp table I found at an auction for $60.  Jon made some slight repairs and glued to tighten it.

Today, I start "repainting" the already painted floors.  A multi-step process to replicate wood grain finish called Faux Bois--very popular finish during the Victorian era.  I'll post photos to show steps and results. 

"Before" - Oh my, what can I say?  This photo is among others taken a year ago Jan 2009.  I put the photos in a folder and called the folder "Homeless Shelter". 
Photo taken Fall 2009 - Hauled away the junk!

Sunday, January 24, 2010

Polished Pewter Drapes & Tiffany Style Lamp


If at first you don't succeed, try, try, again.  I ran out of material to make all the valances for the three windows in the North Bedroom.  What to do?  What to do?  I guess the answer was always right in front of my nose . . . forget the valances, go with the panels and sheers only, and let the beautiful wood work shine through.  The door and window trim throughout the house features a daisy design, stems and leaves--spoon carved.  The daisy design is repeated as a focal point in the arched spandrel in the east bay in the living room. 

Another problem I worked out--I had a little trouble with the fabric stiffness--which made it difficult to puddle on the floor. so I abandoned the idea of puddling/piping the hem, and instead added a 3 inch hem--taking it right to the floor.  Doing that allowed the rounded folds to hold their shape. 

My mistake:  Truth is I first wasted fabric making piping for the drapery panel hems . . . fabric that could have made it possible to complete the valances.  Those mistakes are good lessons learned.  Cut the panels first, the valances second, and if enough material is leftover then make piping.

The bed spread is crochet and is ivory to match the woodwork, and sheers.  I did have a lucky day finding the diamond pattern ivory sheers.

Today, I washed the windows, lightly sanded the woodwork, primed with Zinzer.  I'll let it dry, and next weekend paint two coats of ivory semi-gloss.  Jon changed out the receptacles and light swtich to gray color, and I finished installing the pewter finish switch plates.  I don't know why, I never seem to do things exactly in the right order.

Yesterday I found a beautiful queen sleigh bed, box springs, and mattress.  Actually it is the same color finish as the thrift shop table above.  Dark, but with warm tones.  For months I've been looking for a bed.  I saw lots of fancy ones with lots of carvings--but the carvings turned out to be "molded pieces" . . . i.e. "plastic".

The sleigh bed won't be delivered until the end of February because I want to paint the north bedroom floor.  They have been painted floors for a long long time.  I'm going to try my hand at painting the floor "faux bois finish", like the downstairs woodwork was originally painted by artisans. 

Here is a nice little table purchased a couple weeks ago at a thrift shop.  I paid $15.  The silver pitcher found for $6.00 at Galesburg Antiques Mall, and the little silver birds at Furniture Phases in Appleton--$3.00 for the pair.  The Tiffany style lamp I bought early last summer at Brass Butterfly near Weyauwega. 

Saturday, January 16, 2010

Warm Reds


I appreciate the warm red dining room walls, especially during the winter months.  The wall color is Flaming Sunset by Valspar.
Here are a couple photos of a Northwoods punch bowl, pedestal, and 6 cups, I found last weekend at a second hand store.  If you know more about this beautiful piece, please let me know.  I love the marigold color--it's warm like the dining room.  The rim of the punch bowl, i.e. its tips repeat a form found in the kitchen light fixture--tips of leaves around the bowl.  (see kitchen photos Dec 2009).


Here are some little birds sitting on the mantle.  A repeating theme throughout the house is "birds".  I took inspiration from the original etched glass  front porch doors of birds, and the swan medallions on the exterior doors (front porch).


Here's view of the dining room from the kitchen.  We had no antique furniture in the house prior to moving here.  Little by little one piece after another arrived. 

Summer of 2008 I was on the bucket truck scraping the exterior of the house--when my friend Kathy stopped by and asked me to run with her to a garage sale.  She had pre-shopped the garage sale and found two great commodes.  I told her I was too dirty and couldn't go, but she persisted.  So, looking like a ragga-muffin, I grabbed my purse and we went to the sale.  Holy moly, I bought both commodes for $130 right here in my own community of 350 people. 

On the commode here is a photograph of the Thomas Quien family, c 1910.  Left to right are the Quien children Bessie, Gusta, Peter, and Ragnhild.  Peter bought our house in December 1917.  His daughters Donna and Mary Jane inherited the house and kept it in the family until after their deaths, (Donna passed away in November 2006).  We closed on the house in April 2007.

At the lower left of the photo is a white enameled pail with red handle.  I have several enameled pails of different sizes, shapes, and colors.  We use them constantly--in the house and in the garden for harvesting vegetables.  Here, the little pail holds onions for cooking. 


I received the walnut spindle couch from my Aunt Mary in 2007.  Thank you Aunt Mary--we treasure having this piece in our home. 

It was a couch that belonged to my grand parents Bert and Leatha.  It is such a pretty thing.  I bought a bolt of fabric and recovered the couch and had enough fabric left over to make drapes for the office/music room.


Sunday, January 10, 2010

Polished Pewter Wall Color for North Bedroom


Below, you can see the result of repaired wall cracks and with two skim coats of plaster.  The walls are silky smooth.


The wall color is Polished Pewter to match the drapery fabric. 

Today, I painted two coats on the ceiling "off white", and cut around the edges of woodwork and first coat of wall color.  Next weekend I'll paint last coat on wall, two coats of semi gloss on woodwork.  The camera must be playing tricks with me, I just noticed the cobalt blue swipe on the south wall.  Or, it could be the house ghost playing tricks on us again.

Postscript:  You'll notice we didn't finish plaster and paint at the ceiling perimeter.  When we finish all the upstairs walls--we trim each room with crown molding.

Saturday, January 2, 2010

New Fabric for Victorian Bedroom


Here's the gray-blue fabric for the north bedroom windows/walls. Next is discussion on the drapery function--then I can come full circle with a design drawing. In my head I'm seeing fabric covered buttons and fabric braids for embellishments on the valances. When I squint my eyes I see the blue in this gray, and the same will appear in the wall color "Polished Pewter".

There is blue in this fabric but is not fully appreciated in the above photograph. Up-close the fabric has a grasscloth appearance with threads of dark brown. Forget bringing out the dark brown in accents--not my cup of tea. It is the diamond pattern that wows me, and the shimmer of the fabric. The diamond pattern is texture made by heavier threads and mimics a pattern I love in the living room spandrel at the east bay windows where our Christmas tree sits. See post below Our Christmas Story.

Tuesday, December 29, 2009

Transformation - a Victorian Bedroom

My project this week is repairing wall cracks and skim coat plaster in the north bedroom. Here are some recent before and after photos. This is a large 17 x 13.5 north facing upstairs bedroom--which is not quite so private. The bedroom is street side.

The little round holes you see in the walls between the windows are ports where insulation was blown into the walls. The house is well insulated now, and new storms and screens added in October 2007. We heat with wood, and have a backup natural gas furnace. When the wood fire dies out each morning--the natural gas furnace kicks in. The upstairs is actually warm and comfortable in the winter.
Last night I photographed the three north facing windows. It gives you an idea of what the first the wall crack repair and first skim coat of plaster looks like. The new ceiling dry wall was installed first. Durabond and web tape to cover insulation port holes and every hairline wall crack, then allowed to dry thoroughly--then spits of durabond crumbs are scraped clean from the walls. A day later the skim coat plastering begins, then sanding, then a second coat of hand troweled plaster, and more sanding.
The bedroom entrance door is shown here. To the left of the door you can see the southwest corner of the room where there is a half chimney--noted by the hole in the wall where a wood burning heating stove once sat.

Here's yesterday's photo, showing crack repairs, half chimney hole patched a couple of times, and first skim coat of plaster.
Today I'm on the ladder with a mask scraping plaster spits and ridges of plaster from the walls, then and a light sanding, and ready for the second skim coat of plaster. Jon said he'd come help me today, and plaster the nail holes in the new drywall ceiling, and second sanding of taped joints.
I'd like to finished the wall and ceiling plaster this week and prime the ceiling and walls with Zinzer 1-2-3 before the weekend. Wish me luck. I'm almost 60 years old, and my oh my--going up and down the ladder really bothers my left hip.
Here are more before and after "work in progress" of the northeast corner (same view).
The plastering and sanding work is relaxing to me and gives me time to think about a wall color for the room.
Right now, I'm lost--I just can't settle on a color. I think what I need to do is take a "road trip" to find a bolt of drapery fabric to dress the 3 windows. Most of the time I find fabric first, then the wall color seems to fall into place.
I'm open to comments about color for the room. Any suggestions? Remember this--in the evening you'll be able to see the room color prominently from the street. My dining room is red, and from the street in the evening, it casts a beautiful warm glow. I'm leaning toward repeating the red dining room color in the bedroom. But, I'm afraid my Mom will make a comment about "red light district". Ha. Ha.