Pages

Sunday, October 11, 2009

Happy Halloween - Decorating

While treasure hunting, I found some wire mesh hanging baskets to recycle. I turned the cone shaped baskets upside down, and positioned halloween masks. I'll add some mini lights this evening. In the mix of things is a garden porcelain pan (not really cleaned since gathering the last of the tomatoes, green peppers from the garden). Jon harvested two wheelbarrows of squash: butter nut, acorn, and hubbard.
Below is the mail box at the east porch (summer kitchen door). I've had it for many years, and it was found in the garage at my parent's home. I don't know its origin (what ancester had it on their house). The squares design appears on the reproduction hardware in my kitchen. I've repeated the design in the kitchen cabinet glass panels.
Wreaths are usually expensive. But in this case I made 3 of them on the cheap. I found two flower bouquets and cut the bouquets apart, rewired flowers and leaves to inexpensive ready to decorate wreaths. A nice wreath at each of the 3 entrances for about $10 each.

Dad and Mom both worked on their share of screen doors for this old house. I believe Dad worked on the one shown here. Afterwards, he installed new black screening. Doesn't look like a 116 year old door, does it? But, it is!
Above is the east entrance (summer kitchen door). Jon rebuilt the railing July '09. Right now, I have a tub of spindles for the front porch--salvaging them to rebuild and reassemble for the front of the house.
The tub of spindles (about 3-4 dozen) Mom and I picked off aligatored paint, repaired and sanded while she was here in September for a week. Some of the spindles Jon used chemical stripper.
Some of the spindles we pieced back together with carpenter's wood glue. It worked very well. Quite a few spindles I dug out soft wafer like wood from the top of the bulb of the spindle. Carefully I added wood filler and allowed to dry. Then again, add more wood filler until the bulb was rounded, then lots of hand sanding to smooth. This activity in September resulted in a sprained thumb for me. It is still sore as heck.
Jon's cousin Lloyd shaped (milled) the two piece horizontal railings, and the remaining straight pieces are 2 x 2. We're leaving the step railing as is--because its probably been there for the last 50 years--works just fine--and no particular need to deconstruct it.

Above is a wooden box Jon found in the barn. It says, Scandinavia Co-Op Mercantile Co., Scandinavia, WI. (That's our little town, population 350). Also pictured is Jon's favorite brown rocking chair--picked up at an auction for $30. I recovered the cushion with some colored indian corn chaneille fabric.

Building the Two Story Garage - more photos

Jon had some help yesterday from Eric. They positioned and secured the rafters for the second story roof. This morning Jon lifted the 4 x 8 sheets of OSB sheeting to the rafters.
I journeyed to the back of the garage and climbed up the ladder to snap a photo of the second floor studio.

Above is a view of the roughed in studio. In the middle of the 12 x 48' studio will be a five foot corridor to the right, and opening for the stairs to the left of the corridor. The stairs will reach the second floor by means of a west end dormer (not yet built). The dormer second floor landing will make a "u" turn and enter the upstairs studio. There will be a matching east dormer at the five foot corridor. I can see it in my mind, however, it will be next spring before the dormers are built. Winter is coming on too fast, and Jon is conscentrating on getting the roof on, windows and doors installed, and wrap second floor with Tyvek.

Jon lifts OSB sheets to roof line to install.

Jon putting bucket in position near the roof line to unload the OSB sheet.

At the base of the bucket you can see the brackets Jon welded to hold the OSB boards while making the lift.
He slides the sheet into position. After the first lift, Jon came into the house for a break, and said he's decided to change his approach on positioning OSB board.

Saturday, October 10, 2009

Garage Build Continues

Yesterday DH Jon finished building the second floor walls, and then lifted each 60 lb. rafter and laid it upside down. Today he'll have some help positioning and securing the rafter sections. The OSB sheathing will go down, followed by roof paper and architectural shingles. The windows will be installed on the north end (street side), and a larger one at the south end. Winter is coming on fast. Heavy frost this morning. The final step before winter is to cover the second floor exterior with Tyvek, install main garage doors, and wire the garage.
This photo taken the second week of September. The garage lower level divided by wall. This divides the garage parking space from the workshop in the rear. The stairway to the second floor will be installed next spring.
Photo taken Oct 5th, before second floor was constructed.

DH build north wall on the ground, then lifted it into position with the bucket truck. Remaining walls were built on the second floor and lifted into position.
Jon built the second floor by himself. Amazing patience, and skill!

Above: Photo taken Oct 5.

Above Photo taken yesterday, Oct 9. Jon was very tired last night. It's been a cold, rainy week to build the second floor. This week he built the second floor walls in 16 ft. sections by himself, then lifted each one into position and secured. He is one strong dude.

Thursday, October 1, 2009

Sweet Lucille, A Porch Person (Life-Size Doll)


Porch People Like Sweet Lucille are fun to make. I made her in an afternoon.


1. Take 2 standard pillows, hand sew them together together (end to end).


2. The lower pillow is split open vertically and sewn up again to make the thighs. Two fabric tubes are stuffed with sturdy but light weight pool noodles. Socks, shoes, clothing are adding during staging.


3. I make a fabric neck tube and stuff and hand sew to join head and torso. The top pillow stuffed is the torso.


4. To make Lucille sit up straight I use a 30" long wooden dowel for her spine. The wooden dowel begins at her bowel, travels up the back spine, and ends up penetrating her entire head. Ooooo, sounds like it would hurt doesn't it?


5. Two stuffed fabric tubes make the arms.


6. Head. 6 eclipse shaped fabric pieces sewn together and filled with poly fluff make a round head--you might use a pumpkin pattern. After the pumpkin head is stuffed, sew small buttons, one at either side of the head where you'll sew on the ears. Use the buttons as anchors. With a doll head needle (a needle that is 4-5" long), wrap end of the thread around one button, then pass the needle through the head horizontally to the other ear button. Cinch the thread tight to draw the head into a more oval shape and wrap the thread many times around the button to secure. Again, pass the needle back through the head to the other ear, cinch, and wrap the thread many times to secure. Take several stitches to firmly secure the oval shaped head.


7. Make "C" shaped ears out of several layers of fabric. Sew ears on either side of the head keeping the buttons behind the ears to hide them.


8. Add wig, hat, glasses, earrings, gloves, and there you have it . . . Lucille, a porch person.

Tuesday, September 29, 2009

Halloween and Other Porch People


This is Jumpin Jack Flash. We welded him together a couple of years ago with steel rod frame, added a hunk of 2 x 4 for a neck, a recycled pumpkin head, pool noodles for arms, and some clothes. I had a problem getting his pants on, and had to open up the inner leg seams to dress him, then sit under him to sew his pants backup.

Friday, September 18, 2009

1903 Photo of our Front Porch

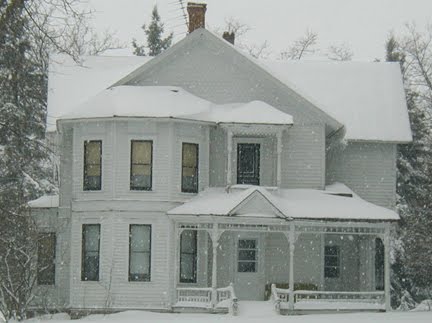
Imagine our surprise. The Iola Historical Society brought us this amazing photograph of our home c. 1903. Second left is our own Mabel Wrolstad, youngest daughter of Mathea and John Olson Wrolstad (builders/first owners of our 1893 Queen Anne). I'm guessing she's about 16 years old in this photo.

Below is the porch as it is today. Not much changed. I'm in the process of restoring the original 116 year old porch spindles (cleaning, patching with wood filler, sanding, replacing dowel ends). We refrabricated the two-piece railings to match original. When I finish spindles we'll re-assemble railings and build front steps. Later on I'll post photos as we complete the project.

Unfortunately the original railings are wafer thin, broken and decayed. Nonetheless we saved all those pieces and gave some pieces to grandchildren of the second owners.

Saturday, September 12, 2009

Building the New Garage


I really know nothing about building a garage. And my words below fail to describe the building process. But, here goes . . .

Jon and Dad (Gale) are putting up the new garage this week. They've had some help from brother Willie, and friend Al a couple of days. Mom and I pick up nails, materials, and we sweep at the end of the day.
Mom and Al watch Jon up in the trusses, tying the trusses one to the other with a series of lengths of lumber.

The garage footprint is 28 x 48. The gable ends running north and south.

Willie and Al watch Jon up in the trusses. Later on Willie will begin nailing OSB Board on the roof. The 48' length of garage will be divided in half. The south end a modified workshop for Jon, and the north end two garage door openings.

Securing trusses together with a ladder type fixture (see fixture lying on the floor).

The bucket truck lifts trusses into place.


Putting up OSB Board on the exterior. Later long metal straps are attached to the side walls to add strength.

Jon coming down from the trusses.

Brother Willie helping install OSB board, while Jon attaches with nailing gun.

Preparation work was extensive before the garage could be built. Several trees were removed, tree stumps dug up and hauled away. Weeks and weeks of adding course fill, tamping, and installing floor drains. The concrete pad just below the truck is in front of a soon to be passage door.
Dad (Gale) drilling holes to mount wall section on the sillplate bolts.

Day 3--three walls are up!

Dad (Gale) drilling holes in the wall section.

Beginning the garage project.

Jon, Willie, and Gale attach OSB Board to the walls.

Gale attaching sillplate around perimeter of garage.

Earlier in August, pouring the concrete for the garage.